May
28, 2008
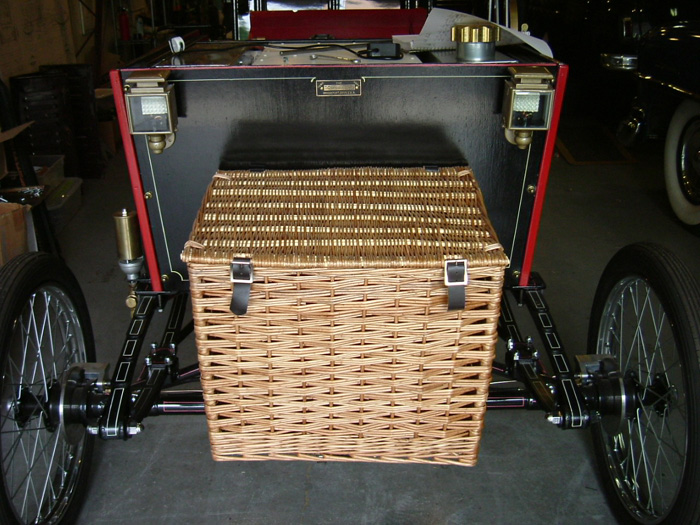
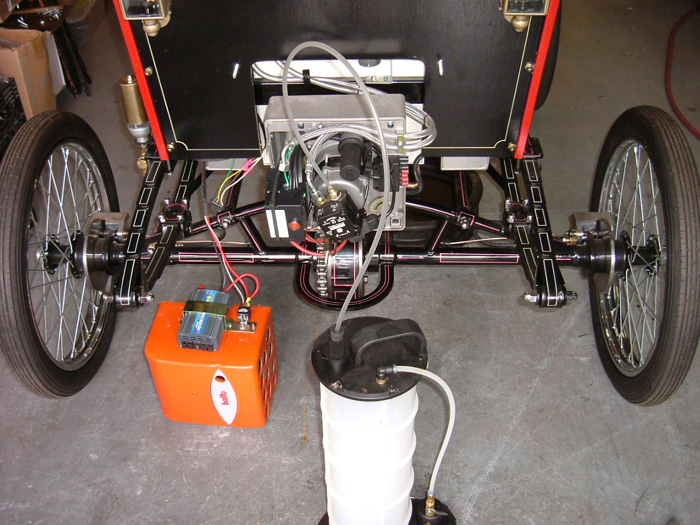
I installed the basket, by centering it on the back panel over
the burner and drilling 2 holes through the basket support and
the back panel. I used 2 carriage head, ¼-20x2",
and 2 wing nuts with washers to secure the basket. This will
also allow easier future servicing.
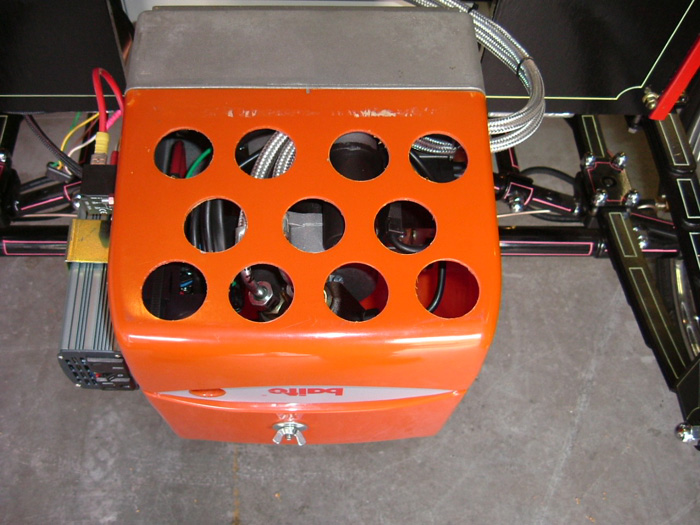
It has been brought to my attention that the burner requires
more fresh air than is allowed by the stock set up. This is
easily accomplished by drilling holes into the top section of
the plastic cover. I drilled a series of 1 ¼ " holes
with a hole saw. Remove the cover from the burner so you don't
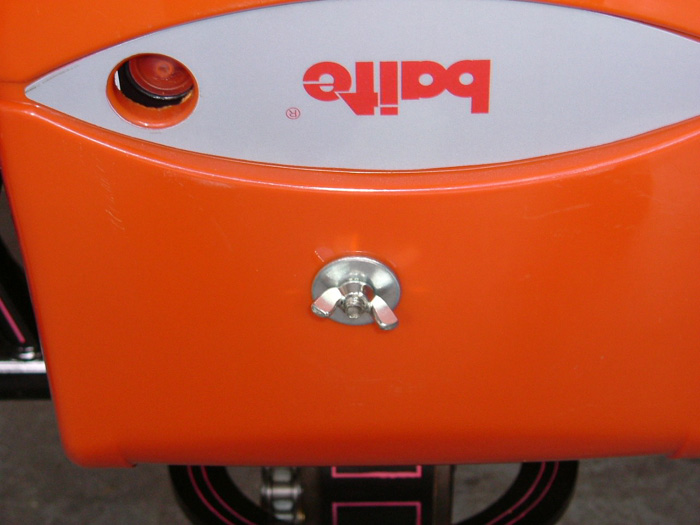
drill into the fuel lines. I also retapped the mounting screw
adapter to ¼ x20, so I could mount a stud and a wing
nut for easier cover removal.
Reinstall the cover and the basket. Loosen the 2 - 13mm
lock nuts that secure the burner nozzle to the boiler and back
out the burner until it just touches the basket. This was recommended
by several builders who have had their cars already steaming,
this moves the flame back slightly for a better heat transfer.
2.0 Hours
I left the cover off the burner and left my panels off at this
time so I could perform my initial tests for steam up. I also
placed the rear axle on jack stands so the rear wheels just
cleared the ground.
I filled the fuel tank with 5 gallons of heating oil, some builders
are using Kerosene. Do not use diesel fuel as it will smoke
and the burner will not run properly. I bled the inlet fuel
line with my vacuum bleeder at the outlet side of the fuel pump.
Secure all the fuel line fittings. Check for any leaks, and
attend as necessary.
Make sure your batteries are charged, add steam oil to the pump
reservoir, bleed this system as described in an earlier build
installment if you haven't done so, and add Hypoid gear oil
75/140 wt to the drip oilier.
Fill the water tanks to full. Open the valves at the boiler
for the turret, open the sight glass valves to allow water into
the sight glass. Using the hand pump, pump water into the boiler
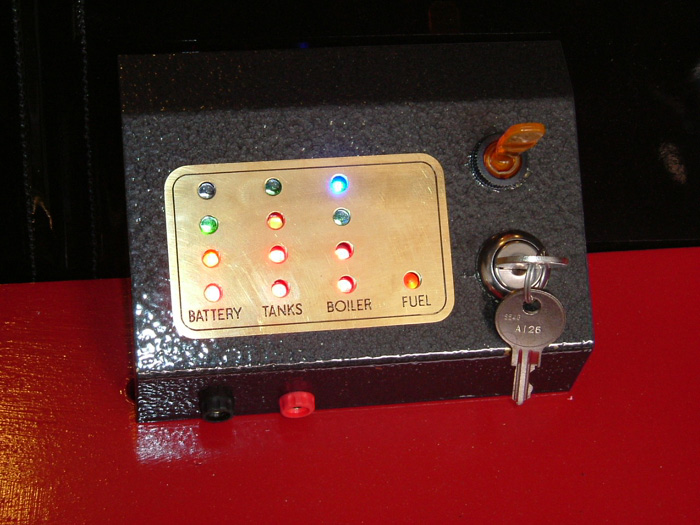
until the sight glass is full. Turn the power switch on the
inverter to off, turn the panel key switch on, and check the
led lights. The water tanks lights should show the top led lit.
and the boiler led 3rd light on. Keep pumping water into the
boiler until the top blue led illuminates. Turn off panel key.
Check for leaks, Check for leaks, Oh Yea; Check for leaks. Attend
to these leaks now, if it leaks now it will be a screamer once
you fire the boiler and add pressure. Patience will pay off.
. I had a few leaks from fittings that I forgot to tighten and
a leak at the water tank bung for a level sensor, the weld wasn't
complete, since there is never any pressure in the tank I used
some 5 minute clear epoxy and that took care of that problem.
3.5 Hours
May 29
With my leaks taken care of it is now time for steam. Make sure
you turned your inverter switch back on. Place your bypass water
valve into the open position. Note; since the water pumps are
always pumping you have to monitor the boiler level, what the
bypass valve does is to allow the water to bypass the boiler
back into the water tank so you don't overfill the boiler. When
the blue led is lit it means there is enough water in the boiler
and you should stop filling. As you drive the blue light will
go out, when the green light (3rd Led) goes out, you need to
close the bypass valve to allow the boiler to refill until the
blue light is lit and then open the bypass valve again.
Put your safety glasses on. Turn on the panel key switch.
You will hear a squealing noise from the inverter, (normal)
and the fan will start to blow for about 20 seconds, then you
should hear the burner ignite, sounds like a muffled jet engine.
Pay attention as things happen rather quickly. Watch your pressure
gauge start to climb, it should reach about 230-250 psi in about
5 minutes. The burner should shut off at about 230-250 psi .
If your boiler does not shut off by 250 you need to adjust the
pressure switch by turning the adjusting screw out until the
burner shuts off.
With the reversing arm in the neutral position, apply a little
throttle to remove any water from the cylinders. Put the arm
in the forward position and apply the throttle and the engine
should rotate the wheels. OH YEA! The damn thing actually works,
I now tried reverse and it worked like it was supposed to. What
an absolute thrill. But, back to reality at hand. Watching the
boiler led lights and the pressure gauge, and playing with the
throttle I ran the engine: The boiler relit itself at 175 psi,
I then noticed the green boiler led light went out so now I
had to close the bypass valve to refill the boiler back to the
blue led being lit. Worked very well as it was designed to.
Reality 101; water and steam leaks; I shut off the console key
and ran the engine on the residual steam for a while, just having
a bit of fun, but also looking in earnest for every steam and
water leak. I used a marker pen to mark all the leaks and wrote
them down in my log book so I wouldn't forget where all the
leaks were. Don't try to tighten or perform any repairs until
the boiler is cool, do not drain any water either, the water
is what keeps the boiler cool. It has been recommended that
the boiler be kept full when parking the car for several hours
or done for the day.
My leaks were as follows:
Both steam chest covers and through the bolt holes
Threaded joint at the safety blow off valve
A welded joint on the turret where the union was threaded
as well as those threads
A welded joint on the R/S water check valve as well as
the straight threads to the boiler
Sight glass fittings to the manifold.
I know you might be impatient for driving the Likamobile, but
fix those leaks now, so when you do drive you only have to worry
about the operation and the fun.
Tomorrow; I will dismantle all the fittings and pieces that
are leaking and repair.
When I first went to fire up my boiler, the system would just
about fire and then shut down. My friend Gil Harris, who I talked
into building a Likamobile, let me borrow his burner set up
so I could diagnose my firing problem and it turned out to be
a faulty Inverter. With Gil's inverter I was able to continue.
Several builders reported that they would melt they're flame
sensors and those remedies were bought forth above.
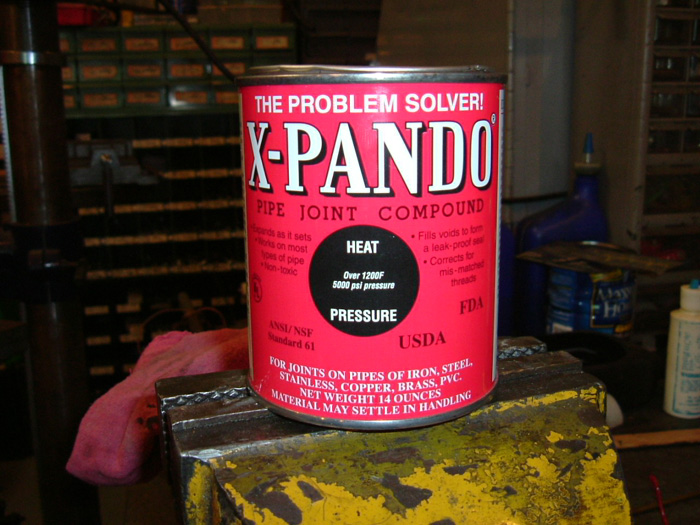
If you have a leak at any welded seams as I have; you can silver
solder them for a good seal and strength. I am using a different
sealer for the straight pipe threads; called Expando, available
at your local plumbing supply. I will be using the Right Stuff
on my valve chests and covers, as this is a rubber sealer that
can stand the steam, heat and pressure. The Hylomar that was
originally suggested by MW's does not perform well under steam
heat/ pressure.
This report should give you a successful first firing as long
as you followed the build and made all the adjustments and changes
as described in the Kits report.
All in all; I'm very pleased. The boiler, burner, and engine
performed as it was designed. Model Works and it's engineers/machinists
have done an out standing job. Yes, there will be some fine
adjustments required, maybe a few updates, needed. But that
will be presented on this build site as more builders get steaming
and report on what they have discovered.
As I'm sure by now everyone knows of the problems with Model
Works going into Administration/ Chapter 11. Brad Buetlich,
California, has set up a Yahoo Group Forum for Likamobile Builders:
http://groups.yahoo.com
Click on the Likamobile Group, ask to be invited. This is the
best way to find out what is going on with Model Works, talk
with other builders and see some pictures. As this is only for
Likamobile builders you will know that everything that is presented
has only to do with you and your build.
My boiler is now cool so I can start draining the water, I'll
report again after I've made my repairs.
Happy
Building
Rick
Click
pictures to enlarge
Likamobile
Home • Kits
One and Two •
Kits
Three and Four • Kits
Four-B and Five •
Caliper Correction
Kits Six and Eight •
Kit
Seven • Kit
Eight • Kit
Nine •
Kit
Ten • Kit
Ten Addendum • Kit Eleven
Kit Twelve •
Kit
Thirteen • Kit Fourteen
• Kit Fifteen •
Year End • Kit
Sixteen • Leaf
Spring Modification
Kits Seventeen / Eighteen
• Engine
Modification • Boiler
Installation • Burner
Installation
Fuel Line, Brake &
Throttle Pedal Installation • Final
Kit • Final Assembly
& Steam Up
Road Test & Modifications
• Purge Modification